Aperture ranges.
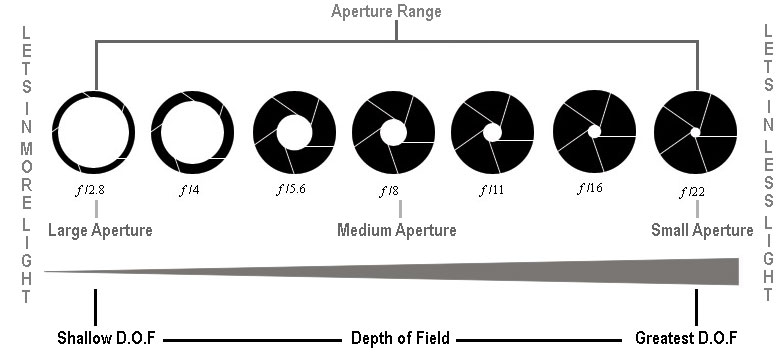
The aperture helps create the depth of field in an image, a large aperture of f2.8 will let a lot of light into the camera, however it will also create a more shallow depth of field as the background will be softer.
So a larger aperture will let less light in, but will have a much larger de[ht of field and will be sharper.
For example.
Shutter speed.
Shutter speed is how fast the lens is open for. For example, if the lens was open for 2 minutes, its would capture movements, like a river running. When if you had a smaller shutter speed you would capture a something how it was that 1/125th of a second you took the photo. Shutter speed is very important in photography as it determines how your photographs are going to turn out. Its very interesting playing around experimenting with shutter speed as it helps create loads of very amazing photographs.

an example.

ISO.
The ISO is to do with the light in the area you are taking the photo. The higher the the ISO the more light the camera lets in, but the higher the ISO the more digital noise you will have.

The aperture, shutter speed and ISO all work together in a triangle.
Depending on what shutter speed you have, you will have to work the aperture with it so the camera gets the right amount of light in.
Below is an example of the exposure triangle.

Different lightings.
The ISO helps with your lighting situations, for example if you were in a studio all your light is controlled, however if you were out and about you would be using natural light, which is a lot more difficult as you have no control on how and when it changes.
below is a photograph of natural light, and depending on what time you take photographs throughout the day depends on what settings you need your camera to be on, which if you were taking photographs for more then half an hour chances are you would have to change them to suit the new lighting.

Below is the lights you would use if you were in a studio, which would stay the same unless you decided to change there settings. So its much easier photographing in studio as the light is controlled.

photographing in the rain.
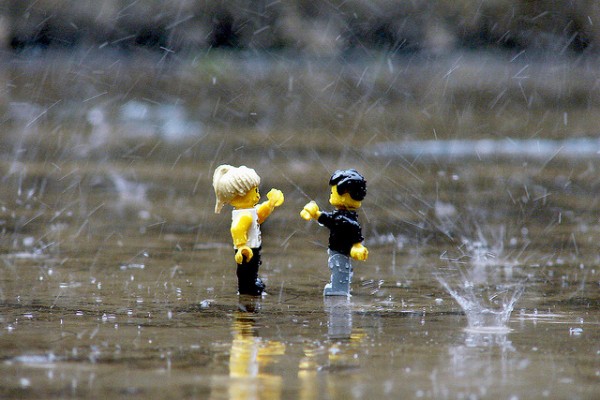
Depending on how good water proof case you get, depends if you can use your camera in water or not.
Using the rain as an idea for a shoot can help you create interesting images, reflections in puddles, raindrops, and even people running around.

snow.

Snow is just water frozen, so obviously you would either have to make sure the camera doesn't get wet or use a water proof case. Snow is also very bright, which would man you would need a high aperture to try and stop the photographs being overexposed.
Fog.
Fog is almost a natural soft box, as it gives off gloomy atmosphere most photographers love photographing it as i gives such a strong sense of place. Fog can also create interesting shapes as no detail of objects can be seen.

sunshine.
Many struggle photographing in the sunshine, but there are tips like turning the flash on, to try to avoid shadows (unless you want shadows) another tip in to actually take the photograph in the shade looking out onto the light.

The photographs below shows how much the light will change throughout the day.


Camera settings.
- On the top row left is where you can change the shutter speed.
- In the middle of the top row is where you can change the aperture setting.
- On the right of the top row is where you can change the ISO settings.
-The large M shows how large you are going to develop these pictures too (M stands for mediam), for example if you have it on small thats perfect for just putting photographs in a photo album however if you developed them into a an A3 image, you would loose some quality. Alos if your taking your photos on L (large) and only have them as A5 images, it will look just the same as if you had taken them on S (small) however it would of took a lot more memory up on your camera.

Here is an example of my camera.

Camera lens.

Theres many different types of lenes, theres wide eye lens that create a much wider feel to the image.
There are also fish eye lens, which make the photographs be seen how a fish would, which is a round ball. Its very interesting to experiment with a range of lens as they all help create unique interesting photographs. There are also lens that are design just the photograph close up with small aperture ranges, which are often known as macro len's.
below is a fish eye lens.

below is a wide eye lens

below is a macro lens.

Composition.
Composition is also known as the rule of thirds.
Its designed to help photographs give a nice layout to there photographs, its helps make photographs aware of where the clients eyes are going to get drawn to.
The photo below has all its key detail in the right sections, so you automatically look there first.

The photograph below has all its subjects in the middle row, the centre of the photograph which is usually where all the viewers of the image would look first.
Priority settings-
If your new to using your camera, or your not very good at calculating what settings you need you could put you camera on either shutter or aperture priority, so for example if you put it on shutter priority, you choose what shutter speed you ant to use and the camera will calculate the rest.

Here is an example of what the aperture priority will look like on your camera.

And here is what shutter priority will look like.
Safety.
Safety tips for working with cameras are..
1. Make sure no water gets on any of the cameras or lights.
2. Make sure if your camera takes batteries you recycle them once used.
3. Make sure the flash isn't to bright/close to someones eyes.
4. Make sure if your working in a studio not to have cables loose on the floor in case people trip.
5. Whenever you are using a tripod you need to make sure it is secure on stable ground.
6. Make sure the camera is secure on the tripod.
